The EclipseLink Tutorial
The EclipseLink implementation of JPA has a tutorial for running it with JSF on the Tomcat servlet container, instead of a full-blown Java EE Application Server.The tutorial mentions two source code downloads, both of which were missing from the page, but I managed to find a directory of the stubbed tutorial source that you can use as a starting point as you follow the EclipseLink tutorial, as well as the code for the completed version of the application.
Unfortunately, the tutorial is out-of-date, the source code has several errors, and the application itself is very primitive, but you may be curious enough to want to try it out anyway. This is how to get the completed application running on Tomcat against a PostgreSQL database using the Eclipse IDE.
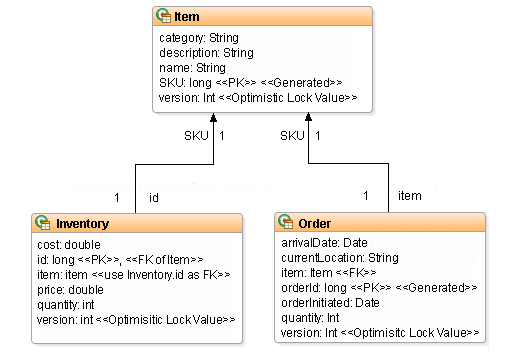
The application is a very simple Order application with this object model:
Set up the environment
Download and unzip the code for the completed version of the application. It is an Ant project that is not structured like an Eclipse Dynamic Web Project, so just create a simple Java project, called here EclipseLinkTutorial, and import the source code order-jsf-jpa-example-128127 from your download folder.Tomcat is a servlet container, not a Java EE application server like WildFly (formerly known as JBoss Application Server), so you must manually copy the PostgreSQL database driver as well as the EclipseLink and Java Persistence JARs to EclipseLinkTutorial/lib. I got mine from my Maven repo because I had used them in another project. They are:
- postgresql-9.3-1102-jdbc41.jar
- eclipselink-2.6.0-M3.jar
- javax.persistence-2.1.0.jar
Configure the database
Switch to your database server, fire up psql as postgres and create a login role (a.k.a. the user) and database:CREATE ROLE eclipselinktutorial LOGIN SUPERUSER CREATEDB; ALTER ROLE eclipselinktutorial PASSWORD 'eclipse'; CREATE DATABASE eclipselinktutorial WITH ENCODING='UTF8' OWNER=eclipselinktutorial;
Test the connection from Eclipse, where 'your-DB-server' is either the hostname of your database server or 'localhost' if you have installed PostgreSQL on your workstation:
→ Window → Open perspective → Other... → Database development
Right-click Database Connections → New... → Connection
Profile Types: PostgreSQL
Name: eclipselinktutorial
→ Next
Database: eclipselinktutorial
URL: jdbc:postgresql://your-DB-server:5432/eclipselinktutorial
User name: eclipselinktutorial
Password: eclipse
Check the 'Save the password' box then click on Test Connection. It should say "Ping succeeded". Click on Finish.
Configure the JPA persistence properties
Edit the persistence file EclipseLinkExample\persistence-unit\src\META-INF\persistence.xml and set the following properties to match the database configuration (don't forget to change 'your-DB-server'):<persistence xmlns="http://java.sun.com/xml/ns/persistence" xmlns:xsi="http://www.w3.org/2001/XMLSchema-instance" xsi:schemaLocation="http://java.sun.com/xml/ns/persistence persistence_1_0.xsd" version="1.0"> <persistence-unit name="default" transaction-type="RESOURCE_LOCAL"> <provider>org.eclipse.persistence.jpa.PersistenceProvider</provider> <class>oracle.toplink.jpa.example.inventory.model.Inventory</class> <class>oracle.toplink.jpa.example.inventory.model.Order</class> <class>oracle.toplink.jpa.example.inventory.model.Item</class> <properties> <property name="javax.persistence.jdbc.logging.level" value="FINE" /> <property name="javax.persistence.jdbc.driver" value="org.postgresql.Driver" /> <property name="javax.persistence.jdbc.url" value="jdbc:postgresql://your-DB-server:5432/eclipselinktutorial" /> <property name="javax.persistence.jdbc.password" value="eclipse" /> <property name="javax.persistence.jdbc.user" value="eclipselinktutorial" /> </properties> </persistence-unit> </persistence>
Fix the project
The downloaded source code directory from the Oracle site has errors that cause the Ant build.xml script to fail.It is missing directories that the Ant build.xml script expects, so create the following folders:
- persistence-unit/classes
- persistence-unit/deploy
- extras/classes
- web-application/classes
- web-application/deploy
Mapping metadata cannot be applied to properties/methods
that take arguments.
Annote the field version in the entity Item with @Version and remove the getter and setter to fix this.
The entity Item also has the annotations @Id and @GeneratedValue on the method getSKU(), not the field SKU itself. Move them to the correct place:
@Id
@GeneratedValue
protected long SKU;
There are two named queries in Order that will generate build errors because 'SKU' is incorrectly written 'sKU'. Edit Order and make sure they both read 'SKU".
In the build.xml file, include this line to each of the three javac directives to suppress warnings when the Ant build runs:
includeantruntime="false"
Lastly, edit the DDLGenerator class in extras/src to replace "toplink.ddl-generation" with "eclipselink.ddl-generation" so that when the generate-tables target is executed, the correct property is set to instruct the Entity Manager to recreate the tables.
Generate the database tables
Now you are ready to run the Ant builds:Right-click EclipseLinkTutorial/build.xml → Run As → Ant Build...
Deselect the default target to be executed and select generate-tables
→ Run
If it runs very quietly with no errors, you have succeeded. Yay.

Now create the data by executing the Ant target populate-data.
Generate the WAR
The last step is to compile and package the WAR for deployment to Tomcat:Right-click EclipseLinkTutorial/build.xml → Run As → Ant Build...
Select the default target all and check that the other targets are deselected
→ Run
It will create EclipseLinkTutorial/web-application/deploy/jpa-example.war which you can deploy to your instance of Tomcat.
Of course, getting the complete application up and running is one thing. Understanding JPA is another, so download the stubbed code, roll up your sleeves and work through the tutorial.